Test Card: 65nm EVGA GTX 260 Core 216 896MB
Tools that you need to get started:
Riva Tuner v2.22 [Link: ]RivaTuner v2.22 download from Guru3D.com
Step 1 - Prepping Riva Tuner
1. After you’ve installed Riva Tuner , open it and go to the Hardware monitoring section.
2. Click on ‘Customize’ and select the magnifying glass (Hardware Monitoring) icon.
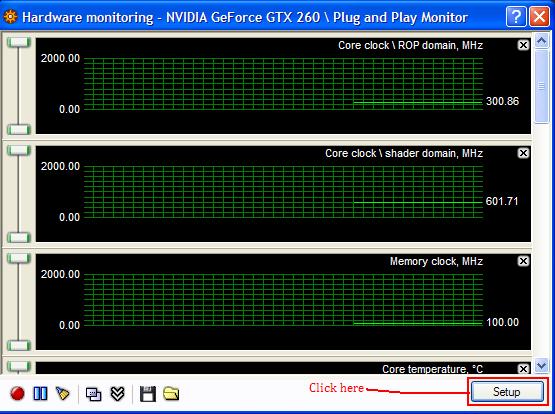
3. This would open the hardware monitoring window with voltage, temp and other readings.
 |
This image has been resized. Click this bar to view the full image. The original image is sized 962x406. |

4. Click on ‘Setup’ on the bottom right of this window.
5. From the window that opens up, select ‘Plugins.’
6. In the Plugin Modules window, scroll down and tick the VT1103.dll
7. Select OK to close the Plugins Window.
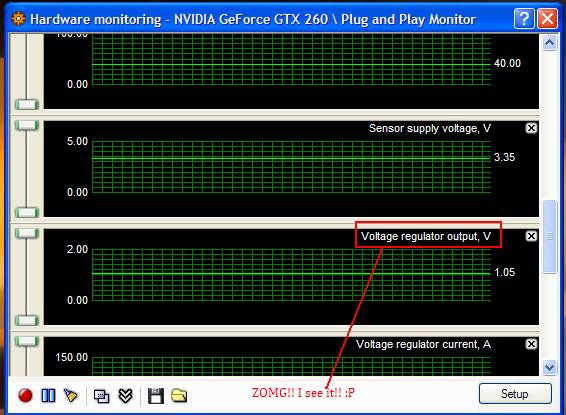
If you performed the above steps correctly, you should now see a Voltage regulator output, V as one of the monitors in the Hardware Monitoring Window. This Voltage regulator output, V will show you the voltage that your Card is idling at.
Step 2 – Determine the I2C Bus of the card
1. Open Command prompt (Start >Run >cmd)
2. Navigate to your Riva Tuner directory.
3. Once in the Riva Tuner directory, write this command and hit ENTER.
rivatuner.exe /ri0,70,1a /ri1,70,1a /ri2,70,1a /ri3,70,1a
This command will poll to the four I2C buses and tell you where your card is located. The r in the command stands for read, i stands for i2c, and the 1a is the register that we are polling.
4. A small window will pop up with info about the bus on which your card is. In our case, this is the i3 Bus. From now on, you should commit i3 to your memory because all polling/writing will be done to the 03 I2C BUS.
Step 3 – Determine Voltage Registers of the card
We will now repeat the command that we used in Step 2 again but with a slight difference. Two out of the 4 registers that we polled are responsible for idle and load states. Hence, we have to find which ones exactly so that we can write correctly to each register. Obviously, you’d want to reduce your Idle Voltage and Increase your load voltage.
1. Again, open Command Prompt.
2. Navigate to your Riva Tuner directory as in Step 2.
3. Type in this command and hit ENTER
rivatuner.exe /ri3,70,15 /ri3,70,16 /ri3,70,17 /ri3,70,18
Here’s how it would look in DOS
What we’ve done effectively is that we polled registers 15, 16, 17 and 18 of the I2C #3 BUS. The numbers that you see on the extreme right are in Hexadecimal and we need to convert them to Decimal to find the voltage. Use this website for your hex to decimal conversions: Hex to decimal converter
Once we’ve determined what each hex value is equivalent to in decimal, we put them in the following equation to calculate the voltage for each register:
Voltage = (VID*0.0125) + 0.45
So, our first hex value is 38 for register 15. The decimal equivalent of 38 Hex is 56, so let’s use it in the equation:
Voltage = (56*0.0125) + 0.45 = 1.15 Volts
Similarly, we’ll calculate the Voltage for register 16, 17 and 18 as follows:
Register 16 – 36(in hex) = 54(in decimal) = 1.125 Volts
Register 17 – 30(in hex) = 48(in decimal) = 1.05 Volts
Register 18 – 31(in hex) = 49(in decimal) = 1.0625 Volts
Now, all that’s required is for you to match these voltages to the Voltage regulator output, V in your Hardware monitoring window.
Notice that our idle voltage in the monitor is exactly the voltage for our register 17. This shows that Register 17 is responsible for your card’s idle state. Makes sense? Ideally, you won’t get an exact value but you should choose the closest value.
But what about the Load state? Go fire up a movie in winamp or media player or anything that would put the graphic card under load and keep the Voltage regulator output, V monitor right in front of your eyes. Riva Tuner’s showing that the card under load is at 1.06 V. Does that ring bells? Look at the voltage we calculated for Register 18
So now, we have determined that the registers responsible for our card’s idle and load state are Register number 17 and 18 respectively.
The hard part is over. The fun part begins with Step 4
Step 4 – Adjusting the Voltages
We are going to use an identical command as in the previous steps, but instead of read, we will be using write this time. Here’s a table of hex values and their voltage equivalents calculated by an equation derived from the previous equation:
VID = (Voltage – 0.45)/0.0125
2C = 1.00v
2F = 1.03v
30 = 1.05v
3A = 1.17v
3F = 1.24v
40 = 1.25v
4F = 1.44v
Example:
For 1.50V, the equation would deliver VID = (1.50 - 0.450) / 0.0125 = 84 = 54 (in Hex).
54 = 1.50v
Now that we have everything we need, let's change some voltages.
1. Open Command Prompt.
2. Navigate to the Riva Tuner directory.
3. Type in this command with substituted values and hit ENTER
rivatuner.exe /wi3,70,register,hexadecimal value
i.e. if I want to change my idle voltage (register 17), this is what my command would look like
Rivatuner.exe /wi3,70,17,2C (where 2C = 1.00 Volts)
I’ll now execute the command to change both my idle and load voltages. Look at the resultant Hardware Monitor for Voltage Regulator Output, V.
Load State as I fire up a music video in Winamp
Now, you can save these settings or configure macros in Riva Tuner to change your voltage on the fly or have these settings take effect on boot up. Now, you can push your Graphic card's clocks even further and get awesome results.
Caution
Try this modification entirely at your own risk. I will not responsible for any damage caused to your card. Do not put in ridiculously high figures for load state voltages and don't end up voiding your warranty.
Happy Overvolting 
Remember to keep the room and system cool, use a good air conditioner courtesy Buy.Guru


 Similar Threads


 Add to Cyn1c's Karma
 Show Printable Version
 Email this Page
 Linear Mode
